Being able to create a formula in Excel is fundamental to being able to use Excel well.
Writing an Excel formula is much the same as writing an equation.
With just a little bit of instruction you will be creating Excel formulas in no time! You definitely need this skill in your toolbox if you need to calculate GST or multiply and subtract using Excel formulas.
And of course, you will be able to confidently read other people's Excel formulas which is awesome when you want to work out what the formula is actually doing.
In this blog I cover:
- Data types that can be used to create a formula in Excel
- How to create a formula in Excel using cell references
- How to write a formula in Excel
- How to create a formula in Excel for multiple cells
- How to create a formula in Excel example with download file
- How to create a formula in Excel step-by-step
Data types that can be used to create a formula in Excel
Before you start your first formula understand that only some types of data can be used in a formula.
Excel is constantly checking if a number, a date or text has been entered into a cell.
Excel formulas can only be performed using cells that contain numbers or dates. These type of cells are commonly referred to as values.
Checking the alignment of a cell’s content is a good way to check if a cell can be used in a formula.
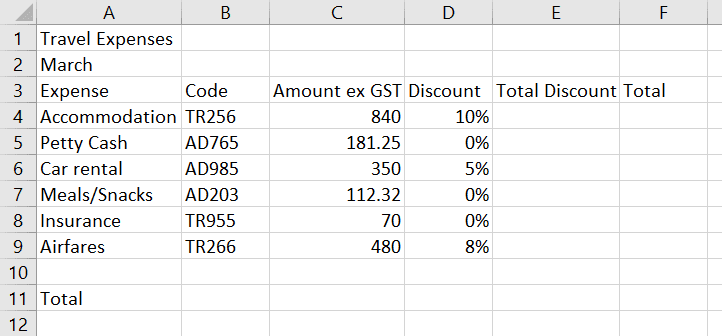
When you enter text into a cell, Excel will automatically align the text to the left of the cell, as shown in column A in the example below. These data types cannot be used in a formula.
When a number or a date (a value) is entered into a cell the alignment will automatically be aligned to the right, as shown in column C. This data can be used in a formula.
Data that is a mixture of alpha and numbers is treated as text, as shown in column B. Alphnumeric data cannot be used in a formula.
How to create a formula in Excel using cell references
Writing Excel formulas is much the same as writing an equation. However, in Excel we begin a formula with the equals sign.
A formula can include numbers and cell references.
For example: =840*10% or =C4*D4
The formula example below shows the figures 840 and 10% will be entered in separate cells.
The result of a formula is stored in a separate cell, Cell E4.
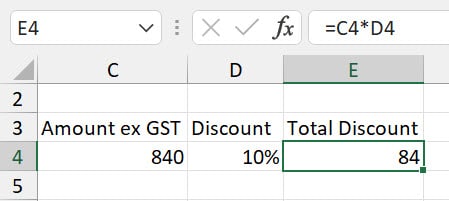
840 has been entered in Cell C4 and 10% has been entered in Cell D4. The formula can be written as =840*10% or =C4*D4.
Both of these calculations would produce a result of 84. However, using real numbers rather than cell references can be dangerous.
If Cell C4 updates from 840 to 940, the calculation using real numbers will not update to 94 unless you re-enter the formula as =940*10%.
Choosing to write a formula using cell references rather than actual numbers is far more practical.
Any number entered in cell C4 automatically is part of the calculation. Therefore, if the calculation is written using cell references instead of real numbers, updating Cell E4 to 940 will automatically update the result to 94.
Note: when entering cell references, the column number precedes the row number in the cell address. Column references can be entered in upper or lowercase.
How to write a formula in Excel
Formulas start with an equals sign (=) and can be made up of values, cell references, mathematical operators and Excel functions. Formulas are entered manually into a cell.
To start entering a basic Excel formula:
1. Click the cell that will hold the calculation result. In our example above this would be cell E4.
2. Press the equals key (=). In our example above this would be =C4*D4. Note, all formulas must start with an equals (=) sign. This indicates to Excel that you are creating a formula. Without the equals sign the formula is seen as normal data and is entered into the cell as such.
3. Press ENTER to perform the calculation.
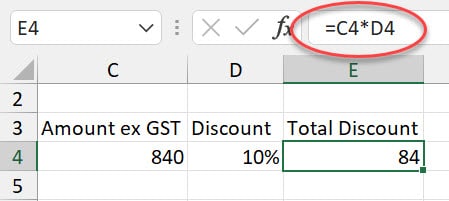
Excel will now display the calculated result on the worksheet, and the formula used to find the result is displayed in the Formula Bar.
This method is most useful when you are using just one standard mathematical operators such as plus, minus, multiplication and divide.
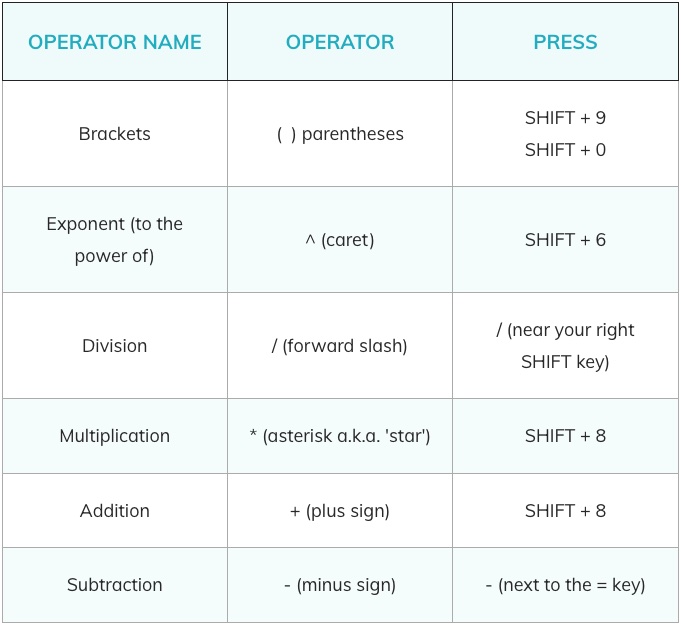
The Table below shows the standard operators that are used in Excel calculations and where to find them on your keyboard.
Tip: most of the operators can also be found on the numeric pad on your keyboard.
Operator Name | Operator | Press |
|---|---|---|
Brackets or parentheses | ( ) parentheses | SHIFT + 9 |
Exponent (to the power of) | ^ (caret) | SHIFT + 6 |
Division | / (forward slash) | / (near your right SHIFT key) |
Multiplication | * (asterisk a.k.a. 'star') | SHIFT + 8 |
Addition | + (plus sign) | SHIFT + 8 |
Subtraction | - (minus sign) | - (next to the = key) |
How to create a formula in Excel for multiple cells
Take a look at the Table above again. If you look at the first letter of each of the operator names you will notice it creates the acronym BEDMAS.
You need to be aware that Excel calculates all formulas according to the BEDMAS (also known as BODMAS, PODMAS, and PEDMAS) hierarchical structure - the order in which to calculate mathematical expressions.
When Excel calculates a formula it checks from the top to the bottom of this list and performs the calculations according to where they are placed in the hierarchy.
So when you start to create formulas that have more than one operator, the BEDMAS rule kicks in.
For example: If you wanted to calculate 7 plus (+) 3 multiplied (*) by 10 you would presume you would end up with 100, however the following happens:
Your formula would look like this = 7+3*10 result 37
37 is not the answer you would have expected.
Excel calculated the formula according to the built-in hierarchical structure where multiplication is performed before addition. Therefore Excel multiplied 3 by 10 first, and then added the 7.
To overcome this problem you would need to enter the formula as follows:
Your formula would look like this = (7+3)*10 result 100
You have now instructed Excel to calculate the addition of 7 plus 3 first by placing brackets around the calculation.
Excel now calculates this part of the equation first as bracketed formulas will always be the first calculations performed, as per the hierarchical structure.
Super tip: always use brackets when creating formula with multiple operators.
How to create a formula in Excel example with download file
Check out my video below on how to subtract the right way. Click here to download the exercise file to follow along with me and try out creating formulas to subtract, add and multiply.
For a deeper dive into creating formulas in Excel you can check out the full blog here How to subtract in Excel (minus formula).
How to create a formula in Excel step-by-step
In the following example we will create a basic Excel formula to calculate the contents of cell C4 multiplied by D4.
1. Click the cell that will hold the formula result, in this case E4 and then press the = key.

2. Select cell C4. You can do this either by clicking the cell, using your arrow keys to move the the cell or by typing the cell reference directly into the calculation. You will notice “marching ants” around cell C4 indicating that you have selected it.

3.
Press the multiplication key on the keyboard (*).
4.
Click cell D4. The “marching ants” will highlight D4.

5. Press ENTER. The calculation result will be shown in the cell while the formula used to create the result will be displayed in the Formula Bar.
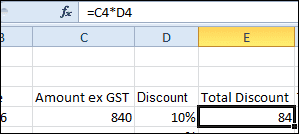
If the numbers are updated in C4 or D4, the formula in E4 will automatically display the updated result.
Was this post helpful? Let us know in the Comments below.
If you enjoyed this post check out the related posts below.

